Using layers in Moldflow
One of my Moldflow co-workers asked me yesterday about today’s Moldflow Monday topic. When I told him “Layers” he didn’t seem too excited. I disagree, Layers can be a useful tool that is sometimes overlooked.
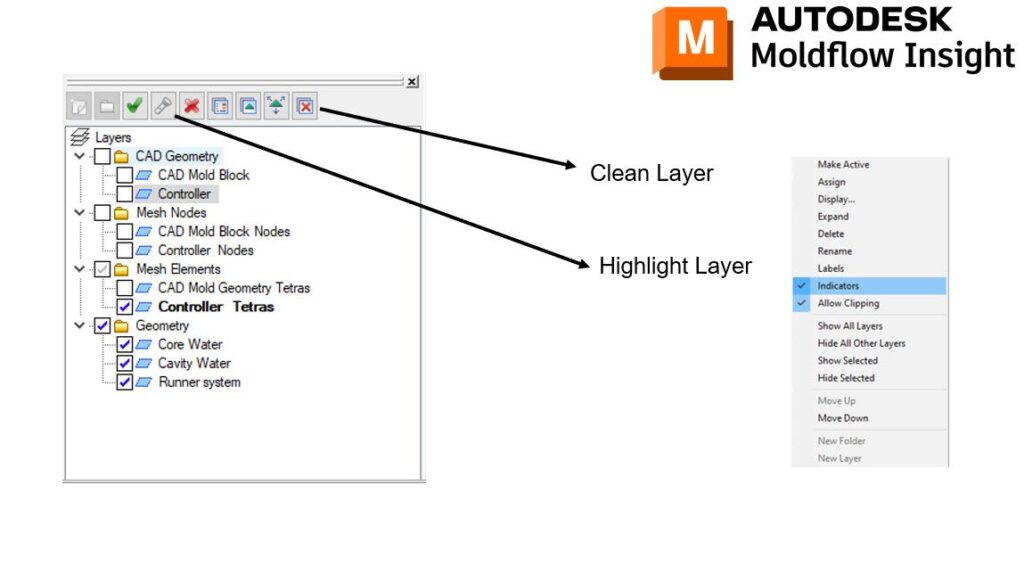
Some Layers are created automatically, like when we mesh. If you want to rename your CAD file, renaming it before meshing will save you time in renaming 1 layer vs 3. You can also change your CAD color by changing the Layer display (right-click on the layer and go to display). This will also change the color or the mesh as well (assuming you change the CAD color before meshing).
Here are some of the actions I perform with layers in Moldflow.
- Automatic Layers: I let Moldflow create certain layers automatically during processes like meshing. This helps maintain a structured approach.
- Naming Convention: I follow a consistent naming convention for layers to easily identify their purpose. This is particularly helpful when dealing with complex simulations involving multiple components.
- Layer Color Coding: I leverage the option to change the color of layers for better visualization. This is not only aesthetically pleasing but also helps in quickly distinguishing different components.
- Layer Folders: I make use of Layer Folders to categorize related components, such as grouping cooling and runner systems. It keeps the model organized and makes it easier to manage.
- Clean Layer Tool: I regularly use the Clean Layer tool to remove any unnecessary or empty layers. This helps in decluttering the workspace and ensures that only relevant information is retained.
- Highlight Layer Tool: The Highlight Layer tool is handy for quickly locating specific items in the display area. It adds a layer of convenience to the overall navigation within the model.
- Right-Click Method: For tasks like Assign, Activate Layer, or Show/Hide All Other Layers, I use the right-click method. It’s a straightforward and quick way to access these functionalities.
How do you organize your Layers in Moldflow Insight?


